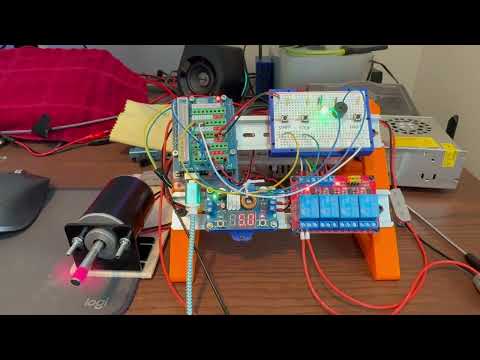
This project simulates a basic industrial Programmable Logic Controller (PLC) system using an Arduino Uno.
It models machine states (Stopped, Running, Fault) and now controls a real 12V DC motor through a relay.

✅ Start Button (Hold 3 seconds to start motor)
✅ Stop Button (Hold 3 seconds to stop motor)
✅ Fault Simulation Button (Instantly trigger fault)
✅ Motor Relay Control
✅ Visual LED Feedback
✅ Audible Buzzer Feedback
✅ Fault Recovery via EEPROM
✅ Non-blocking millis() timing for LED and buttons
✅ Clean C++ classes for LED and buzzer handling
| State | LED Feedback | Buzzer Feedback | Motor Relay |
|---|---|---|---|
| Stopped (OFF) | Solid Red | 2 beeps (stop success) | OFF |
| Running | Solid Green | 1 beep (start success) | ON |
| Holding Start/Stop | Flashing Yellow | None during hold | (Depends) |
| Fault Active | Fast Flashing Red | 3 quick beeps | OFF |
| Fault Clearing | Slow Flashing Red | 2 beeps when cleared | OFF |
| Component | Notes |
|---|---|
| Arduino Uno | Standard AVR |
| Terminal Breakout Shield | For easier wiring |
| NeoPixel LED | 3 pins: 5V, ground and data |
| Piezo Buzzer | 2 pins: ground and data |
| 4-Channel Relay Module | 5V type, triggered LOW |
| 12V DC Motor | Driven by Relay Channel 4 |
| 12V 10A Power Supply | Powers entire system |
| 3x Momentary Buttons | Start, Stop, Fault Sim |
| 3D-Printed DIN Rail mounting parts | Optional for neatness |
| Arduino Pin | Connected To |
|---|---|
| D2 | Fault Simulation Button |
| D3 | Stop Button |
| D4 | Start Button |
| D7 | NeoPixel LED (Signal) |
| D8 | Piezo Buzzer |
| D12 | Relay Channel 4 (Motor Control) |
| VIN/GND | Buck converter + relay + Arduino |
-
Clone the repository:
git clone https://github.com/Beedlebub/plcTrainer_Uno.git
-
Open project in VSCode + PlatformIO.
-
Verify
platformio.inisettings:[env:uno] platform = atmelavr board = uno framework = arduino lib_deps = adafruit/Adafruit NeoPixel@^1.12.5 monitor_speed = 115200
-
Connect hardware as per wiring diagram.
-
Upload firmware:
- Press PlatformIO "Upload" button or use
pio run --target upload.
- Press PlatformIO "Upload" button or use
-
Open Serial Monitor (115200 baud) to watch debug output.
- Phase 3.0.5
- Updated
HARDWARE_OVERVIEW.md:- Added 12V DC Motor entry to hardware requirements
- Documented Relay Channel 4 (D12) controlling the motor
- Specified Buck Converter supplying power via VIN/GND
- Clarified NeoPixel and Piezo functions
- General documentation cleanup for better clarity and maintainability
- Confirmed Arduino Uno pin mappings are complete and accurate
- Minor wording improvements in existing documentation files
- Updated
- Add some analog sensors to the circuit: light and temp
- Work on an Arduino Nano RP2040 Connect hardware variant
- Port this functionality to OpenPLC
- Expand system to higher voltages (12V and eventually 24V).
MIT License
Build smart. Build safe. Build awesome. And above all — build fun things! 🚀