- Prerequisites and Installation
- Creating Spring Boot Project
- Starting a Spring Boot App
- Adding a REST Controller
- Returning Objects From Controller
- Behind the Scenes
- Spring MVC- The View Tier
- Topic API - The 1st REST Api we'll build
- Creating Business Service
- Ways to Start a Spring Boot App
- Using application properties
- Spring Data JPA
- Course APIs - Creation
- Adding Entity Relationship and Extending Repository
- Lesson APIs
- Actuator - Monitoring App
- Swagger (Documentation Tool)
- Packaging Production Ready App
- STS 4
- JDK 8 or higher
- Maven download and setup path for
JAVA_HOME,M2_HOME,MAVEN_HOME - Add Maven Bin folder and Java Bin folder in the end of path under system variable
-
Created a Maven project (Simple project checkbox selected)
-
Given proper group/ artifact id and finish
<groupId>com.swarna.springboot</groupId>
<artifactId>CourseAPI-Spring-Starter</artifactId>
<version>0.0.1-SNAPSHOT</version>
<name>CourseAPI-Spring-Starter</name>
<description>CourseAPI-Spring Boot Starter project created took help from Java Brains</description>- Added below dependencies for Spring boot
<!-- https://mvnrepository.com/artifact/org.springframework.boot/spring-boot-starter-parent -->
<parent>
    <groupId>org.springframework.boot</groupId>
    <artifactId>spring-boot-starter-parent</artifactId>
    <version>2.1.12.RELEASE</version>
</parent>

<dependencies>
    <!-- https://mvnrepository.com/artifact/org.springframework.boot/spring-boot-starter-web -->
    <dependency>
        <groupId>org.springframework.boot</groupId>
        <artifactId>spring-boot-starter-web</artifactId>
        <version>2.6.1</version>
    </dependency>
</dependencies>

<properties>
    <java.version>1.8</java.version>
</properties>
Startup Steps
-
Sets up Default Configuration
-
Starts Spring Application context
-
Performs class path scan (Using different annotations)
-
Starts Tomcat Server
- Created a java class
CourseApiApp.javain\src\main\java\com\swarna\springboot
@SpringBootApplication //annotation to tell Spring , this is a Boot Application
public class CourseApiApp {
	public static void main(String[] args) {
// In background, this will start a servlet container and host my application there
		SpringApplication.run(CourseApiApp.class, args);
	}
}
Now run Spring Boot Application using Run as => Run as Java Application
If you got error, "The port may already be in use or the connector may be misconfigured". You have to stop that port.
-
Find the process ID (PID) for the port (e.g.: 8080)
On Windows:
netstat -ao | find "8080"Other Platforms other than windows :
lsof -i:8080 -
Kill the process ID you found (e.g.: 20712)
On Windows:
Taskkill /PID 4624 /FOther Platforms other than windows :
kill -9 20712orkill 20712
Controller is responsible for taking http requests and provide certain http responses.
A java class marked with annotations. It has info about
- what url it triggers to.
- what method to run when accessed.
@RestController // This will tell Spring that this is a Controller
public class HelloController {

	@RequestMapping("/hello") // This will map the path with the sayHi() function
	public String sayHi() {
		return "Hi"; // We will get "Hi" in http://localhost:8080/hello
	}
}Spring automatically converts REST Controller returning object into JSON. We dont have to do anything.
Created a Topic class named Topic.java
public class Topic {
	private String id;
	private String name;
	private String description;

 // Generated Constructor using fields and without fields
// Also generated Getters and setters and constructor
}
Created a controller named TopicConntroller.java , which will return a list of Topics
@RestController
public class TopicController {

	@RequestMapping("/topics")
	public List<Topic> getAllTopics() {
		return Arrays.asList(
				new Topic("spring","Spring Framework","Spring Framework Description"),
				new Topic("js","JavaScript","JavaScript Description"),
				new Topic("java","Core Java","Core Java Description")
				);
	}
}BOM stands for Bill Of Materials. A BOM is a special kind of POM that is used to control the versions of a project’s dependencies and provide a central place to define and update those versions.
BOM provides the flexibility to add a dependency to our module without worrying about the version that we should depend on.
- Convenient
- Servet container config is now application config
- Standalone application
- Useful for microservices architecture
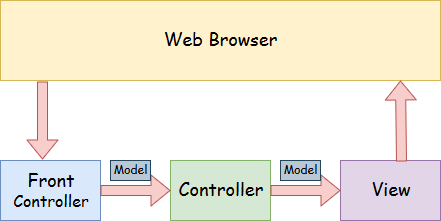
A Spring MVC is a Java framework which is used to build web applications. It follows the Model-View-Controller design pattern. It implements all the basic features of a core spring framework like Inversion of Control, Dependency Injection.
A Spring MVC provides an elegant solution to use MVC in spring framework by the help of DispatcherServlet. Here, DispatcherServlet is a class that receives the incoming request and maps it to the right resource such as controllers, models, and views.
- Resources: Topic, Course, Lesson
- A topic can consists of several courses.
- A course can consists of several lessons.
| Request Type | URI | Description |
|---|---|---|
| GET | /topics | Get all Topics |
| GET | /topics/id | Get a specific Topic |
| POST | /topics | Create a new Topic |
| PUT | /topics/id | Updates the topic. |
| DELETE | /topics/id | Deletes the topic |
@Autowired : Used to tell spring to inject Service class dependency whenever required. We don't have to inject manually as like Angular, we just have to define it.
@RestController
public class TopicController {

	@Autowired
	private TopicService topicService;
    ...
}
Now we creating Business Service to handle data and rules.
TopicService.java
@Service
public class TopicService {

	private List<Topic>  topics= Arrays.asList(
			new Topic("spring","Spring Framework","Spring Framework Description"),
			new Topic("js","JavaScript","JavaScript Description"),
			new Topic("java","Core Java","Core Java Description")
			);

	public List<Topic> getAllTopics() {
		return topics;
	}
}
TopicController.java
@RestController
public class TopicController {

	@Autowired
	private TopicService topicService;

	@RequestMapping("/topics")
	public List<Topic> getAllTopics() {
		return topicService.getAllTopics();
	}
}Add this in TopicService.java
public Topic getTopic(String id) {
    //return topics.stream().filter(t -> t.getId().equals(id)).findFirst().get();
    // The above one line code can be replaced by full code below.
    Topic topic = null;
    for (Topic t : topics) {
        if(t.getId().equals(id)) {
            topic = t;
        }
    }
    return topic;
}
Add this in TopicController.java
@RequestMapping("/topics/{id}")
public Topic getTopic(@PathVariable String id) {
	return topicService.getTopic(id);
}
Now, Response I get going into http://localhost:8080/topics/spring
{"id":"spring","name":"Spring Framework","description":"Spring Framework Description"}First we need to use mutable string i.e. ArrayList instead of Arrays.List. Unless we will get 500 Error.
Update the List in TopicService.java
private List<Topic> topics = new ArrayList<>(Arrays.asList(
    new Topic("spring", "Spring Framework", "Spring Framework Description"),
    new Topic("js", "JavaScript", "JavaScript Description"),
    new Topic("java", "Core Java", "Core Java Description")));

//Add below code at the end
public void addTopic(Topic topic) {
    topics.add(topic); //This will add a topic into existing ArrayList topics
}
Add this in TopicController.java to send a POST request.
@RequestMapping(method = RequestMethod.POST,value = "/topics")
public void addTopic(@RequestBody Topic topic ) {
	topicService.addTopic(topic);
}
To test this, send
POST URL : http://localhost:8080/topics
Headers: Content-Type (application/json)

Body :
{
    "id": "javaee",
    "name": "Java Enterprise",
    "description": "Java Enterprise Description"
}
Response : 200 OK

Now send GET : http://localhost:8080/topics
You will get the added Topic in topics ListAdd this in TopicController.java to send a PUT request.
@RequestMapping(method = RequestMethod.PUT,value = "/topics/{id}")
public void updateTopic(@RequestBody Topic topic , @PathVariable String id) {
    topicService.updateTopic(id, topic);
}
Add this in TopicService.java to UPDATE
public void updateTopic(String id, Topic topic) {
	for (int i = 0; i < topics.size(); i++) {
		Topic t = topics.get(i);
		if(t.getId().equals(id)) {
			topics.set(i, topic);
			return;
		}
	}
}
To test this, send
PUT URL : http://localhost:8080/topics/js
Headers: Content-Type (application/json)

Body :
{
    "id": "js",
    "name": "Updated JavaScript",
    "description": "Updated JavaScript Description"
}
Response : 200 OK

Now send GET : http://localhost:8080/topics
You will get the updated Topic in topics ListAdd this in TopicController.java to send a DELETE request.
@RequestMapping(method = RequestMethod.DELETE,value = "/topics/{id}")
public void deleteTopic(@PathVariable String id) {
    topicService.deleteTopic(id);
}
Add this in TopicService.java to DELETE
public void deleteTopic(String id) {
    topics.removeIf(t -> t.getId().equals(id));
}
To test this, send
DELETE URL : http://localhost:8080/topics/javaee
Headers: Not Required
Body : Not Required

Response : 200 OK

Now send GET : http://localhost:8080/topics
You will get the updated Topics in topics ListCreated application.properties in src/main/resources
server.port=8080

#used to ignore some error message from apache derby DB
spring.jpa.hibernate.ddl-auto=update
Now the app will start using port 8081
Here are some good resources for application.properties file.
To connect our server with database , we need to use Spring Data JPA.
JPA = JAVA Persistence API
Object - Relational Mapping
Added Spring Web, Data JPA and Apache Derby DB as Database.
<dependencies>
		<dependency>
			<groupId>org.springframework.boot</groupId>
			<artifactId>spring-boot-starter-data-jpa</artifactId>
		</dependency>
		<dependency>
			<groupId>org.springframework.boot</groupId>
			<artifactId>spring-boot-starter-web</artifactId>
		</dependency>

		<dependency>
			<groupId>org.apache.derby</groupId>
			<artifactId>derby</artifactId>
			<scope>runtime</scope>
		</dependency>
	</dependencies>

	<build>
		<plugins>
			<plugin>
				<groupId>org.springframework.boot</groupId>
				<artifactId>spring-boot-maven-plugin</artifactId>
			</plugin>
		</plugins>
</build>Added @Entity and @Id in Topic.java
@Entity - Used for creating a entity(or Table) named Topic , which having 3 columns - id, name, description
@Id - specify id as a primary key of the table.
@Entity
public class Topic {

	@Id
	private String id;
	private String name;
	private String description;
Created a interface TopicRepository.java which extends CrudRepository which is having all essential methods for CRUD operations.
import org.springframework.data.repository.CrudRepository;
public interface TopicRepository extends CrudRepository<Topic, String> {

	//getAllTopics()
	//getTopic(String id)
	//addTopic(Topic topic )
	//updateTopic(@Topic topic ,String id)
	//deleteTopic(String id)
	// Above methods will be handled by CrudRepository
}-
First in TopicService.java , we have to inject TopicRepository using @Autowired
-
Delete topics list initialization line.
-
Rewrite code within various methods for GET, POST, PUT, DELETE
TopicService.java
@Service
public class TopicService {

	@Autowired
	private TopicRepository topicRepository;

//	private List<Topic> topics = new ArrayList<>( Arrays.asList(new Topic("spring", "Spring Framework", "Spring Framework Description"), new Topic("js", "JavaScript", "JavaScript Description"),new Topic("java", "Core Java", "Core Java Description")));

	public List<Topic> getAllTopics() {
		List<Topic> topics = new ArrayList<>();
		topicRepository.findAll().forEach(t -> topics.add(t)); //findAll returns iterable
		return topics;
	}

	public Optional<Topic> getTopic(String id) {
		return topicRepository.findById(id);
	}

	public void addTopic(Topic topic) {
		topicRepository.save(topic);
	}

	public void updateTopic(String id, Topic topic) {
		topicRepository.save(topic);
	}

	public void deleteTopic(String id) {
		topicRepository.deleteById(id);
	}
}| Request Type | URI | Description |
|---|---|---|
| GET | /topics/{topicId}/courses | Get all Courses |
| GET | /topics/{topicId}/courses/{courseId} | Get a specific Course |
| POST | /topics/{topicId}/courses | Create a new Course |
| PUT | /topics/{topicId}/courses/{courseId} | Updates the Course. |
| DELETE | /topics/{topicId}/courses/{courseId} | Deletes the Course |
Copied full package and pasted as
Renamed Topic to Course accordingly in 4 files. Renamed the URI properly.
Changes of Course.java : added topic as a column in Course table.
@Entity
public class Course {
	...
	private Topic topic;
	...
	public Course(String id, String name, String description,String topicId) {
		super();
		this.id = id;
		this.name = name;
		this.description = description;

        this.topic = new Topic(topicId, "", "");
        //This is just for convinience and not really required. creating this to make it easy to create new Course Objects with given topic
	}

    public Topic getTopic() {
		return topic;
	}

	public void setTopic(Topic topic) {
		this.topic = topic;
	}
Changes of CourseService.java
@Service
public class CourseService {

	@Autowired
	private CourseRepository courseRepository;

	public List<Course> getAllCourses(String id) {
		List<Course> courses = new ArrayList<>();
		courseRepository.findAll().forEach(c -> courses.add(c));
		return courses;
	}
	public Optional<Course> getCourse(String id) {
		return courseRepository.findById(id);
	}
	public void addCourse(Course course) {
		courseRepository.save(course);
	}
	public void updateCourse(Course course) {
		courseRepository.save(course);
	}
	public void deleteCourse(String id) {
		courseRepository.deleteById(id);
	}
}
Changes of CourseController.java
@RestController
public class CourseController {
	@Autowired
	private CourseService courseService;

	@RequestMapping("/topics/{id}/courses")
	public List<Course> getAllCourses(@PathVariable String id) {
		return courseService.getAllCourses(id);
	}

	@RequestMapping("/topics/{topicId}/courses/{id}")
	public Optional<Course> getCourse(@PathVariable String id) {
		return courseService.getCourse(id);
	}

	@RequestMapping(method = RequestMethod.POST,value = "/topics/{topicId}/courses")
	public void addCourse(@RequestBody Course course, @PathVariable String topicId) {
        //Creating a new Topic object with the given name {topicId}
		course.setTopic(new Topic(topicId, "", ""));
		courseService.addCourse(course);
	}

	@RequestMapping(method = RequestMethod.PUT,value = "/topics/{topicId}/courses/{id}")
	public void updateTopic(@RequestBody Course course , @PathVariable String topicId) {
        //Creating a new Topic object with the given name {topicId}
		course.setTopic(new Topic(topicId, "", ""));
		courseService.updateCourse(course);
	}

	@RequestMapping(method = RequestMethod.DELETE,value = "/topics/{topicId}/courses/{id}")
	public void deleteCourse(@PathVariable String id) {
		courseService.deleteCourse(id);
	}
}- Many Courses are linked to same Topic. So this is Many Courses to one Topic relationship.
Course.java
@ManyToOne
private Topic topic;- CrudRepository will automatically takes the portion after findBy and search if there is a variable match in Course.java, If yes, then it will implement a method which will find all courses by name.
public List<Course> findByName(String name);
//This will work for all string properties.- If we want to filter by Topic Id, this not work, because we Topic is a class at its own. So we have to tell spring go in between Topic Class and take its id.
findByTopicId = findBy (Syntax for CrudRepository) + Topic(ClassName) + Id(Property Name) //CrudRepo will automatically implement this.
CourseRepository.java -- we need only define findByTopicId(String topicId)
public List<Course> findByTopicId(String topicId);
// Spring JPA will automatically implement this in background
To get all the courses under a specific topic, edit CourseService.java
public List<Course> getAllCourses(String id) {
    //		List<Course> courses = new ArrayList<>();
    //		courseRepository.findAll().forEach(c -> courses.add(c));
    //		return courses;

    return courseRepository.findByTopicId(id);
}| Request Type | URI | Description |
|---|---|---|
| GET | /topics/{topicId}/courses/{courseId}/lessons | Get all Lessons |
| GET | /topics/{topicId}/courses/{courseId}/lessons/{lessonId} | Get a specific Lesson |
| POST | /topics/{topicId}/courses/{courseId}/lessons | Create a new Lesson |
| PUT | /topics/{topicId}/courses/{courseId}/lessons/{lessonId} | Updates the Lesson. |
| DELETE | /topics/{topicId}/courses/{courseId}/lessons/{lessonId} | Deletes the Lesson |
Used Lombok in Lesson.java to avoid unnecessary boilerplate code.
package com.swarna.courseapi.lesson;

@Entity
@Data
@NoArgsConstructor
@AllArgsConstructor
@Builder
public class Lesson {

	@Id
	private String id;
	private String name;
	private String description;

	@ManyToOne
	private Course course;
}
Changed the LessonController.java , LessonService.java and LessonRepository.java accordingly.
Visit below address to see all the latest changes for these files.
There is a line in pom.xml. You can choose the packaging format. JAR dosent need to run on Servlet container. But WAR need servlet container to run.
<packaging>jar</packaging>To package the Spring Boot app , go to project folder ,
-
list all files and make sure you can see pom.xml
-
swarna@swarna MINGW64 /e/JAVA-Backend/CourseAPI-Spring-Starter (master)
$ mvn clean install
-
jar will be created in
target/CourseAPI-Spring-Starter-0.0.1-SNAPSHOT.jar
You can run the jar file in any java installed environment using :
swarna@swarna MINGW64 /e/JAVA-Backend/CourseAPI-Spring-Starter (master)
$ java -jar target/CourseAPI-Spring-Starter-0.0.1-SNAPSHOT.jarHeroku is a popular platform for hosting all types of applications. There is a Free plan for personal projects also.
In existing Git repo, we just need to Login to heroku, add remote and push our changes
Install the Heroku CLI
Download and install the Heroku CLI.
If you haven't already, log in to your Heroku account and follow the prompts to create a new SSH public key.
$ heroku loginClone the repository (You can ignore this step if you already have git repo initialised)
Use Git to clone courseapi-spring-boot's source code to your local machine.
$ heroku git:clone -a courseapi-spring-boot
$ cd courseapi-spring-bootFor New App
$ heroku create -a example-app
Creating app... done, ⬢ example-app
https://thawing-inlet-61413.herokuapp.com/ | https://git.heroku.com/example-app.git
You can use the git remote command to confirm that a remote named heroku has been set for your app:
$ git remote -v
heroku  https://git.heroku.com/example-app.git (fetch)
heroku  https://git.heroku.com/example-app.git (push)
For an Existing App
Add a remote to your local repository with the heroku git:remote command. All you need is your Heroku app’s name:
$ heroku git:remote -a example-app
set git remote heroku to https://git.heroku.com/example-app.gitMake some changes to the code you just cloned and deploy them to Heroku using Git.
$ git add .
$ git commit -am "make it better"
$ git push heroku master
$ heroku open       -> to open live application in default browser
$ heroku logs -t -> to see live logsWe can choose db instance from a large addon library for heroku app.
For MySQL go to Resources -> Configure Addons , we can choose JawsDB MySQL . There is also a free plan for this.
Resources -> Configure Addons -> JawsDB MySQL -> Install JawsDB MySQL -> Select the app to provision.
-
To see database connection details , from the resources page, click on
JawsDB MySQL -> Settings -> View Credentials
-
We dont need to add the connection details in our application. Heroku will do that intelligently.
pom.xml
<dependency>
    <groupId>org.postgresql</groupId>
    <artifactId>postgresql</artifactId>
    <scope>runtime</scope>
</dependency>
application.properties
spring.jpa.hibernate.ddl-auto:update
spring.jpa.show-sql: true

# Connecting to Postgres Database
#spring.datasource.url=jdbc:postgresql://host:port/database
spring.datasource.url=jdbc:postgresql://free-tier12.aws-ap-south-1.cockroachlabs.cloud:26257/swarna-db-200.defaultdb
spring.datasource.username=swarnadeep
spring.datasource.password=<my_password>
spring.datasource.driver-class-name=org.postgresql.Driver
spring.jpa.properties.hibernate.dialect = org.hibernate.dialect.PostgreSQLDialectMonitoring our app, gathering metrics, understanding traffic, or the state of our database become trivial with this dependency. Actuator is a production-grade monitoring tool
Actuator is mainly used to expose operational information about the running application — health, metrics, info, dump, env, etc. It uses HTTP endpoints or JMX beans to enable us to interact with it.
Adding to POM.xml
<dependency>
    <groupId>org.springframework.boot</groupId>
    <artifactId>spring-boot-starter-actuator</artifactId>
</dependency>
Actuator Links
http://localhost:8080/actuator
http://localhost:8080/actuator/health
http://localhost:8080/beans
Swagger is an Interface Description Language for describing RESTful APIs expressed using JSON. Swagger is used together with a set of open-source software tools to design, build, document, and use RESTful web services. Swagger includes automated documentation, code generation, and test-case generation. It used for -
- Develop APIs
- Interact with APIs
- Swagger UI - Document APIs (Most Important feature)
Adding Swagger to Spring Boot
- Getting swagger 2 Spring Dependency. For now, we need to use Spring boot 2.5.2 , else it will give error in runtime.
<parent>
    <groupId>org.springframework.boot</groupId>
    <artifactId>spring-boot-starter-parent</artifactId>
    <version>2.5.2</version>
</parent>
...
<!-- Production Grade API Documentaion Tool -->
<dependency>
    <groupId>io.springfox</groupId>
    <artifactId>springfox-swagger2</artifactId>
    <version>2.9.2</version>
</dependency>- Enabling Swagger in code
@SpringBootApplication
@EnableSwagger2  // Enabling Swagger so that it can run
public class CourseApiApp {
	public static void main(String[] args) {
		SpringApplication.run(CourseApiApp.class, args);
	}
}
Now you can access swagger at : http://localhost:8080/swagger-ui.html
- Configuring Swagger
- Adding Details as annotations to APIs
application.properties
############### Logging ###############
logging.file.name=logs/application.log
logging.level.root=INFO,ERROR,DEBUG
# Log Level for springframework (info, error, debug etc)
#logging.level.org.springframework = error
# Log Level for Specific Controller
#logging.level.com.swarna.todoFullStack.todo = error
TopicController.java
import org.slf4j.Logger;
import org.slf4j.LoggerFactory;

// defining LOGGER
private static final Logger LOGGER = LoggerFactory.getLogger(TopicController.class);

// using Logger within method
LOGGER.info("Fetching one topic for particular id " +id);
Output file : logs\application.log
Spring boot automatic roll its log files. Lets say logging.file.name=logs/application.log , then it will make a .gz file with the previous day's log and save it in same folder with name : application.log.2022-05-22.0.gz
Caching is a process of storing the objects that are converted from database records into a temporary memory location so that when the client reads the same exact data the orm tools need not go against the database.
To enable caching for our applications Spring boot uses third party cash providers like Hazelcast or EH cache or JBoss cache. Cache Hazelcast is a popular one and we'll use that.
- Add dependencies - SpringBoot and Hazlecast
<dependency>
	<groupId>org.springframework.boot</groupId>
	<artifactId>spring-boot-starter-cache</artifactId>
</dependency>
<dependency>
	<groupId>com.hazelcast</groupId>
	<artifactId>hazelcast</artifactId>
</dependency>
<dependency>
	<groupId>com.hazelcast</groupId>
	<artifactId>hazelcast-spring</artifactId>
</dependency>-
Create Cache Configuration and we need to serialize model class also.
com\swarna\courseapi\config\CacheConfig.javapackage com.swarna.courseapi; import org.springframework.context.annotation.Bean; import org.springframework.context.annotation.Configuration; import com.hazelcast.config.Config; import com.hazelcast.config.MapConfig; @Configuration public class CacheConfig { // @Bean public Config cacheConfig() { return new Config() .setInstanceName("hazle-instance") // instance name for caching .addMapConfig(new MapConfig() // Adding one cache, we can configure as many cache as we want .setName("topic-cache") // cache will be saved with this name .setTimeToLiveSeconds(3000)); // cache will be evicted after 5 minutes } }
Topic.java - Serializing model class also.
import java.io.Serializable;
...
public class Topic implements Serializable {
	private static final long serialVersionUID = 1L;
	...
}
-
Enable and user caching -
@EnableCaching,@Cacheable("cache-name")and@Transactional(readOnly = true)in Controller method.CourseApiApp.java - Enabling cashing in
main()method.import org.springframework.cache.annotation.EnableCaching; ... @EnableCaching public class CourseApiApp { public static void main(String[] args) { SpringApplication.run(TodoFullStackApplication.class, args); } }
TopicController.java - Adding Cacheable and Transactional
import org.springframework.cache.annotation.Cacheable;
import org.springframework.transaction.annotation.Transactional;
...
	@RequestMapping("/topics/{id}")
	@Transactional(readOnly = true) // True for select, for update/insert, false for default
    @Cacheable("topic-cache")
	public Optional<Topic> getTopic(@PathVariable String id) { ... }
}
-
Evict cache method - by what time the cache should deleted.
- LRU(least recently used)
- LFU(least frequently used)
- NONE - application will crash after cache full
- RANDOM
TopicController.java
import org.springframework.cache.annotation.CacheEvict;
...
	@RequestMapping(method = RequestMethod.DELETE,value = "/topics/{id}")
	@CacheEvict("topic-cache")
	public void deleteTopic(@PathVariable String id) { ... }
...
Spring Batch is a lightweight, comprehensive framework designed to facilitate the development of robust batch applications.
Task - Copying data , Transfering files, Generate Reports
Main Task - Run and schedule Jobs
Steps
-
So to implement batching in a spring application we first create a job. A job is comprised of multiple steps each step is comprised of ItemReader, ItemProcessor, ItemWriter. Then Optionally you can also create a JobListener.
Step
-
ItemReader
-
ItemProcessor
-
ItemWriter
-
-
Once we have these all these will be stored in a job repository by spring batch automatically.
-
So the job launcher is responsible for taking the job and executing it when required.
-
Once you have all these in place, you create a job using the job builder factory into the job builder factory you tell- What is the step.
-
to create a step itself, You use a step builder factory.
-
Then we use a database it will store all these details the job details the step details in the database and we use a JobLauncher from Spring Batch to run a particular job.
-
you configure all these items reader item processor item reader and the step and job in a Java based configuration file (BatchConfig) . it will create all these beans inside.
-
you can pass parameters using an object called Job parameters if you want to pass in any additional data to the job itself.