
This repository demonstrates how to integrate MirrorFly's Android SDK into your native mobile application. Implement robust messaging and calling features with minimal development overhead using our fully customizable white-label solution. This documentation details all required libraries, Gradle dependencies, optional features, and installation steps for quick integration.
MirrorFly helps build omni-channel communication apps for any kind of business
💬 In-app Messaging - Connect users individually or as groups via instant messaging features.
🎯 HD Video Calling- Engage users over face-to-face conversations anytime, and from anywhere.
🦾 HQ Voice Calling - Deliver crystal clear audio calling experiences with latency as low as 3ms.
🤖 AI Voice Agent - Build custom AI voicebots that can understand, act and respond to user questions.
🤖 AI Chatbot - Deploy white-label AI chatbots that drive autonomous conversations across any web or mobile app.
🦾 Live Streaming - Broadcast video content to millions of viewers around the world, within your own enterprise app.
With CONTUS MirrorFly Chat SDK for Android, you can easily add real-time chat features to your client app within 30 minutes.
Through our client SDK, you can initialize and configure chat into your app with minimal efforts.
Note : If you're looking for the fastest way to build your app’s UI with MirrorFly Chat SDKs, you can use our sample apps. To get our sample apps, click here
The requirements for chat SDK for Android are:
- Android Lollipop 5.0 (API Level 21) or above
- Java 7 or higher
- Gradle 8.6.0 or higher
- Kotlin 2.0.20 or higher
- targetSdkVersion, compileSdk 35
Note : If you are using Chat SDK version 7.13.27 or higher, you must set the target SDK version to 35, as the SDK has migrated to Android 15.
To integrate MirrorFly Chat SDK into your app, you will need a SDK License Key. The MirrorFly server will use this license key to authenticate the SDK in your application.
Step 1: Register here to get a MirrorFly User account.
Step 2: Login to your Account
Step 3: Get the License key from the application Info’ section
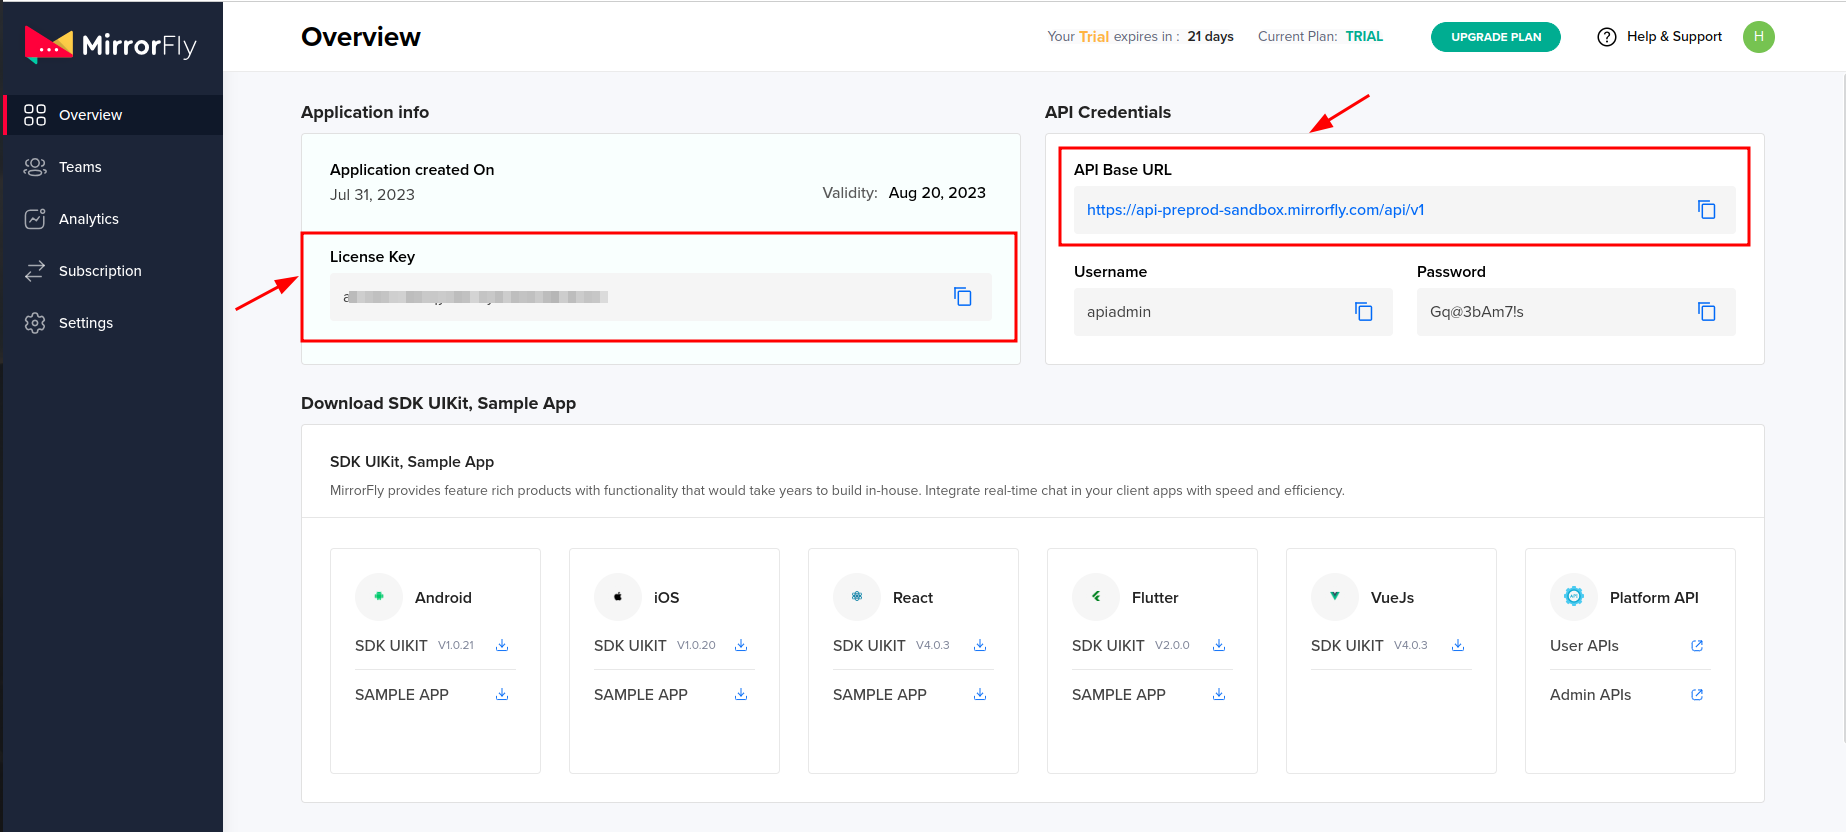
![chat messaging sdk for android][image2]
Step 1: Create a new project or open an existing project in Android Studio. Step 2:
- For Gradle 6.8 or higher, add the following code to your settings.gradle file.
- For Gradle 6.7 or lower, add the code to your root build.gradle file.
dependencyResolutionManagement {
    repositories {
        mavenCentral()
        google()
        jcenter()
        maven {
            url "https://repo.mirrorfly.com/release"
        }
    }
}
![Jcenter][image3]
Step 3: Add the following dependencies in the app/build.gradle file.
dependencies {
    implementation 'com.mirrorfly.sdk:mirrorflysdk:7.13.31'
}
Step 4: Add the following line to your gradle.properties file to prevent conflicts with imported libraries:
android.enableJetifier=trueStep 5: Open the AndroidManifest.xml file and add the following permissions:
<uses-permission android:name="android.permission.INTERNET" />Before initializing the SDK, ensure all prerequisites are met. In your Application class, call the following ChatManager method within the onCreate() function to provide the required initialization data:
![configscyAar][image4]
ChatManager.initializeSDK("LICENSE_KEY", (isSuccess, throwable, data) -> {
    if (isSuccess) {
        Log.d("TAG", "initializeSDK success ");
    } else {
        Log.d("TAG", "initializeSDK failed with reason " + data.get("message"));
    }
});
Add the created MyApplication to AndroidManifest.xml.
<?xml version="1.0" encoding="utf-8"?>
<manifest xmlns:android="http://schemas.android.com/apk/res/android"
    package="com.example.uikitapplication">

    <application
        android:name=".MyApplication"  <!-- Add this line. -->
        android:icon="@mipmap/ic_launcher"
        android:label="@string/app_name"
        android:roundIcon="@mipmap/ic_launcher_round"
        android:theme="@style/AppTheme">

        <activity android:name=".MainActivity">
            <intent-filter>
                <action android:name="android.intent.action.MAIN" />
                ...
                <category android:name="android.intent.category.LAUNCHER" />
            </intent-filter>
        </activity>

    </application>
</manifest>The following method registers a user in sandbox or live mode based on the setIsTrialLicenceKey setting.
FlyCore.registerUser(USER_IDENTIFIER, (isSuccess, throwable, data) -> {
    if (isSuccess) {
        Boolean isNewUser = (Boolean) data.get("is_new_user"); // true - if the current user is different from the previous session's logged-in user, false - if the same user is logging in again
        String userJid = (String) data.get("userJid"); // Ex. 12345678@xmpp-preprod-sandbox.mirrorfly.com (USER_IDENTIFIER + @ + domain of the chat server)
        JSONObject responseObject = (JSONObject) data.get("data");
        String username = responseObject.getString("username");
    } else {
        // Register user failed print throwable to find the exception details.
    }
});After successful registration, the Chat SDK automatically attempts to connect to the chat server. It also tracks application lifecycle changes and manages the server connection, connecting or disconnecting as needed.
After setting the ChatConnectionListener, connection status updates are delivered through the callback method shown below.
ChatManager.setConnectionListener(new ChatConnectionListener() {
    @Override
    public void onConnected() {
        // Write your success logic here to navigate Profile Page or
        // To Start your one-one chat with your friends
    }

    @Override
    public void onDisconnected() {
        // Connection disconnected
    }

    @Override
    public void onConnectionFailed(@NonNull FlyException e) {
        // Connection Not authorized or Unable to establish connection with server
    }

    @Override
    public void onReconnecting() {
        // Automatic reconnection enabled
    }
});To generate a JID for any user, use the below method.
FlyUtils.getJid(USER_NAME);Use the below method to send a text message to other user,
TextMessage textMessage = new TextMessage();
textMessage.setToId(TO_JID);
textMessage.setMessageText(TEXT);FlyMessenger.sendTextMessage(textMessage, (isSuccess, error, chatMessage) -> {
if (isSuccess) {
// you will get the message sent success response
}
});You need to initialize the MessageEventsListener observer to receive and monitor all incoming messages sent to you.
ChatEventsManager.setupMessageEventListener(new MessageEventsListener() {
    @Override
    public void onMessageReceived(@NotNull ChatMessage message) {
        // called when the new message is received
    }
});
These listeners are triggered only when a new message is received from another user. For more details, refer to the callback listeners documentation.
@Override
public void onMessageReceived(@NonNull ChatMessage message) {
    super.onMessageReceived(message);
    // received message object
}The Call feature provides core real-time communication functionality. The Call SDK allows users to initiate one-to-one audio or video calls with other SDK users.
For audio call, we need a below permissions: You can use the below method to check audio call permissions:
Manifest.permission.RECORD_AUDIO
Manifest.permission.READ_PHONE_STATE
You can use the below method to check audio call permissions:
CallManager.isAudioCallPermissionsGranted();For video call, we need below permissions:
Manifest.permission.RECORD_AUDIO
Manifest.permission.CAMERA
Manifest.permission.READ_PHONE_STATE
You can use the below method to check video call permissions:
CallManager.isVideoCallPermissionsGranted();You can use the below method to check call notification permission:
Manifest.permission.POST_NOTIFICATIONSCallManager.isNotificationPermissionsGranted();To include custom data when initiating a call, use the optional metaData parameter in all makeCall methods. This parameter accepts an array of type CallMetadata.
The Voice Call feature enables users to initiate a one-to-one audio call with another SDK user, supporting optional call metadata. Use the following method to start a voice call:
CallManager.makeVoiceCall("TO_JID", CALL_METADATA, (isSuccess, flyException) -> {
    if (isSuccess) {
        // SDK will take care of presenting the Call UI. It will present the activity
        // that is passed using the method `CallManager.setCallActivityClass()`
        Log.d("MakeCall", "call success");
    } else {
        if (flyException != null) {
            String errorMessage = flyException.getMessage();
            Log.d("MakeCall", "Call failed with error: " + errorMessage);
            // toast error message
        }
    }
});The Video Call feature enables users to initiate a one-to-one video call with another SDK user, supporting optional call metadata. Use the following method to start a video call
CallManager.makeVideoCall("TO_JID", CALL_METADATA, (isSuccess, flyException) -> {
    if (isSuccess) {
        // SDK will take care of presenting the Call UI. It will present the activity
        // that is passed using the method `CallManager.setCallActivityClass()`
        Log.d("MakeCall", "call success");
    } else {
        if (flyException != null) {
            String errorMessage = flyException.getMessage();
            Log.d("MakeCall", "Call failed with error: " + errorMessage);
            // toast error message
        }
    }
});The Group Voice Call feature enables users to initiate a voice call with multiple SDK users, supporting optional call metadata. Use the following method to start a group voice call:
CallManager.makeGroupVoiceCall(JID_LIST, GROUP_ID, CALL_METADATA, new CallActionListener() {
    @Override
    public void onResponse(boolean isSuccess, @Nullable FlyException flyException) {
        if (isSuccess) {
            // SDK will take care of presenting the Call UI. It will present the activity
            // that is passed using the method `CallManager.setCallActivityClass()`
            Log.d("MakeCall", "call success");
        } else {
            if (flyException != null) {
                String errorMessage = flyException.getMessage();
                Log.d("MakeCall", "Call failed with error: " + errorMessage);
                // toast error message
            }
        }
    }
});The Group Video Call feature enables users to initiate a video call with multiple SDK users, supporting optional call metadata. Use the following method to start a group video call:
CallManager.makeGroupVideoCall(JID_LIST, GROUP_ID, CALL_METADATA, new CallActionListener() {
    @Override
    public void onResponse(boolean isSuccess, @Nullable FlyException flyException) {
        if (isSuccess) {
            // SDK will take care of presenting the Call UI. It will present the activity
            // that is passed using the method `CallManager.setCallActivityClass()`
            Log.d("MakeCall", "call success");
        } else {
            if (flyException != null) {
                String errorMessage = flyException.getMessage();
                Log.d("MakeCall", "Call failed with error: " + errorMessage);
                // toast error message
            }
        }
    }
});Once a call is connected, you can add participants to the ongoing session. The SDK provides methods to invite users, and they join the active call upon accepting the incoming invitation.
CallManager.inviteUsersToOngoingCall(JID_LIST, new CallActionListener() {
    @Override
    public void onResponse(boolean isSuccess, @Nullable FlyException flyException) {
        // handle invite result
    }
});When an audio or video call is received from another SDK user, the Call SDK displays a notification on devices running Android 10 (API level 29) or higher. On lower Android versions, the activity specified via CallManager.setCallActivityClass() during SDK initialization launches with the call details. A sample call UI is also provided for rapid integration.
When an audio or video call is received from another SDK user, your activity may be launched based on the Android version. When the user taps the accept button in your call UI, invoke the following SDK method to answer the call and notify the caller.
CallManager.answerCall((isSuccess, flyException) -> {
    if (isSuccess) {
        Log.d("AnswerCall", "call answered success");
    } else {
        if (flyException != null) {
            String errorMessage = flyException.getMessage();
            Log.d("AnswerCall", "Call answered failed with error: " + errorMessage);
            // toast error message
        }
    }
});When an audio or video call is received from another SDK user, your activity may be launched depending on the Android version. When the user taps the decline button in your call UI, invoke the following SDK method to reject the call and notify the caller.
CallManager.declineCall();When making an audio or video call to another SDK user, you can disconnect either before the call connects or after the conversation ends. Invoke the following SDK method when the user presses the disconnect button in your call UI to terminate the call and notify the other participant.
CallManager.disconnectCall();MirrorFly offers full freedom with the hosting options:
Self-hosted: Deploy your client on your own data centers, private cloud or third-party servers.
Check out our multi-tenant cloud hosting
Cloud: Host your client on MirrorFly’s multi-tenant cloud servers.
Check out our multi-tenant cloud hosting
MirrorFly offers a fully-built client SafeTalk that is available in:
- iOS
- Android
- Developer Documentation
- Product Tutorials
- Dart Documentation
- Pubdev Documentation
- Npmjs Documentation
- On-premise Deployment
- See who's using MirrorFly
Need a tech team to build your enterprise app? Hire a full team of experts. From concept to launch, we handle every step of the development process. Get a high-quality, fully-built app ready to launch, carefully built by industry experts
If you’d like to take help when working with our solution, feel free to contact our experts who will be available to help you anytime of the day or night.
We're always on the lookout for talented developers, support specialists, and product managers. Visit our careers page to explore current opportunities.