Improve open image section #907
There are no files selected for viewing
Loading
Sorry, something went wrong. Reload?
Sorry, we cannot display this file.
Sorry, this file is invalid so it cannot be displayed.
This file contains hidden or bidirectional Unicode text that may be interpreted or compiled differently than what appears below. To review, open the file in an editor that reveals hidden Unicode characters.
Learn more about bidirectional Unicode characters
| Original file line number | Diff line number | Diff line change |
|---|---|---|
| @@ -1,65 +1,215 @@ | ||
| --- | ||
| jupytext: | ||
| text_representation: | ||
| extension: .md | ||
| format_name: myst | ||
| format_version: 0.13 | ||
| jupytext_version: 1.18.1 | ||
| kernelspec: | ||
| display_name: napari-docs | ||
| language: python | ||
| name: python3 | ||
| --- | ||
|
|
||
| # Open images in napari | ||
|
|
||
| There are multiple ways to open images in napari, depending on the image format and the type of processing you intend to apply to the data. The simplest option is to use napari’s builtin file dialog or drag-and-drop functionality. To open certain specialized data types, such as images saved in custom microscopy formats, you may need to extend napari’s data-loading capabilities by using a specific type of [napari plugin](https://napari.org/stable/plugins/start_using_plugins/finding_and_installing_plugins.html#find-and-install-plugins) called reader plugins. Finally, for maximum flexibility, images can also be opened programmatically, for example via the napari console or in a Jupyter notebook. | ||
|
|
||
| ## Sample images | ||
|
|
||
| Sometimes you just need to open images to test some functionality of napari or a plugin. In that case you can use sample images that come bundled with napari or some plugins. Here is an example of opening the "cell" sample image. In napari, go to `File -> Open Sample -> napari builtins -> Cell` | ||
|
|
||
|  | ||
|
|
||
| ## Builtin napari reader | ||
|
|
||
| napari natively supports TIFF and many other standard formats like PNG, JPG etc. When drag-and-dropping files, using one of the `File -> Open File/Folder` menu options, or using the `File -> Open Sample` menu with such formats, images will be read via the [imageio](https://imageio.readthedocs.io/en/stable/) library and appear in the viewer. | ||
|
|
||
| For example you can try with with your own images or by downloading [this TIFF file](https://ftp.ebi.ac.uk/biostudies/fire/S-BIAD/582/S-BIAD582/Files/01_wt_Dprotein555-TL/raw_mps/5-2b_01_wt_Dprotein555-TL_003_rawmp.tif) (CC0, Clark et al. (2022). BioStudies, S-BIAD582. Retrieved from https://www.ebi.ac.uk/biostudies/bioimages/studies/S-BIAD582) and opening it in napari via drag-and-drop or the file dialog: | ||
|
|
||
| ```{code-cell} ipython3 | ||
| :tags: [remove-cell] | ||
|
|
||
| import pooch | ||
| import os | ||
| from pathlib import Path | ||
| import napari | ||
| from napari.utils import nbscreenshot | ||
| import imageio.v3 as iio | ||
|
|
||
| # make download folder | ||
| download_folder = Path(os.path.expanduser("~")).joinpath("Desktop", "napari-docs-build") | ||
| if not download_folder.is_dir(): | ||
| download_folder.mkdir(parents=True, exist_ok=True) | ||
|
|
||
| file_path_tiff = pooch.retrieve( | ||
| url="https://ftp.ebi.ac.uk/biostudies/fire/S-BIAD/582/S-BIAD582/Files/01_wt_Dprotein555-TL/raw_mps/5-2b_01_wt_Dprotein555-TL_003_rawmp.tif", | ||
| known_hash='5b43ed0269eaa1eebf4c48079270a30e6cc40e87f20cc36c1b3d5a07c51c7b20', | ||
| fname='5-2b_01_wt_Dprotein555-TL_003_rawmp.tif', | ||
| path=download_folder | ||
| ) | ||
| ``` | ||
|
|
||
| ```{code-cell} ipython3 | ||
| :tags: [remove-input] | ||
|
|
||
| # set the size of the viewer for the screenshot, used throughout notebook | ||
| height = 600 | ||
| width = 1200 | ||
| viewer = napari.Viewer() | ||
| viewer.open(file_path_tiff) | ||
| viewer.dims.point = [0,0,0] | ||
| viewer.window.resize(width, height) | ||
| nbscreenshot(viewer, alt_text="napari viewer showing a multi-channel TIFF microscopy image of a Drosophila embryo.") | ||
| ``` | ||
|
|
||
| As can be seen above, the builtin reader correctly interpreted the data to be multi-dimensional by adding a slider, allowing you to scroll through the data. This dataset is composed of three channels and you may prefer that those be shown as separate napari layers. However, the default reader is not capable of reading enough metadata to know this, so it just considers "channels" as an additional dimension. This can be fixed by splitting the layer (right-click on layer and `Split Stack`): | ||
|
|
||
| ```{code-cell} ipython3 | ||
| :tags: [remove-input] | ||
|
|
||
| from napari.layers._layer_actions import _split_stack | ||
|
|
||
| _split_stack(viewer.layers) | ||
| nbscreenshot(viewer, alt_text="napari viewer showing a multi-channel tif microscopy image of a Drosophila embryo with channels split into layers.") | ||
| ``` | ||
|
|
||
| As mentioned above, there are situations where the builtin reader will not be sufficient. For example, `imageio` typically does not support custom commercial/proprietary formats such as those used in microscopy (e.g. CZI, LIF, ND2) or remote sensing (e.g. ENVI). In these cases, napari's reading capabilities need to be extended using an appropriate reader plugin. | ||
|
|
||
| ## Using a plugin reader | ||
|
|
||
| Readers are a specific feature of napari plugins making it possible to open additional file formats via the `File -> Open` menu or drag-and-drop. They are installed in the same way as other napari plugins, either using the Plugins menu or your preferred Python package installer. Read more in our [guide to finding and installing plugins](find-and-install-plugins). Once installed, plugins will be automatically discovered by napari and used for the appropriate files. | ||
|
|
||
| There are two possibilities for reader plugins: they can either be specialized in reading one single file format, or they can be more generic and bundle multiple readers. Using a generic reader plugin has the advantage of reducing the number of plugins and ensuring homogeneous behavior across formats. However, specialized readers may provide more advanced features for a given format. | ||
|
|
||
| If multiple readers are available for a given format, when drag-and-dropping a file, or opening an image via the menu `File -> Open` you will be prompted to select which plugin to use. If you have set a default you can also adjust it in `Preferences -> Plugins -> File Readers` by entering the desired extension and selecting the preferred plugin from the dropdown. | ||
|
|
||
|  | ||
|
|
||
| ### Single format reader | ||
|
|
||
| Some specific file formats have dedicated reader plugins. Here, we use the example of mesh formats that can be visualized in the surface layer. The [`napari-meshio`](https://napari-hub.org/plugins/napari-meshio.html) plugin provides a reader to open a mesh file such as this [example ply file](https://people.sc.fsu.edu/~jburkardt/data/ply/airplane.ply). The plugin can be installed using the napari plugin manager or your preferred Python package manager. | ||
|
|
||
| ```{code-cell} ipython3 | ||
| :tags: [remove-cell] | ||
|
|
||
| file_path_ply = pooch.retrieve( | ||
| url="https://people.sc.fsu.edu/~jburkardt/data/ply/airplane.ply", | ||
| known_hash='370846416b2d0d9c574e356a5b43c7aac2db748761daab270fdd1331f97305a8', | ||
| fname="airplane.ply", | ||
| path=download_folder | ||
| ) | ||
| ``` | ||
|
|
||
| ```{code-cell} ipython3 | ||
| :tags: [remove-input] | ||
|
|
||
| viewer = napari.Viewer() | ||
| viewer.open(file_path_ply, plugin='napari-meshio') | ||
| viewer.dims.ndisplay = 3 | ||
| viewer.camera.angles = (92, -24, 15) | ||
| nbscreenshot(viewer, alt_text="napari viewer showing a 3D mesh of an airplane opened via napari-meshio.") | ||
| ``` | ||
|
|
||
| ### General-purpose reader plugins | ||
|
|
||
| There are a few examples of plugins bundling multiple readers. One example is [ndevio](https://napari-hub.org/plugins/ndevio.html) which wraps the family of [bioio](https://bioio.readthedocs.io/en/latest/) packages to provide support for multiple microscopy file formats. Often such bundled reader plugins come with a set of formats supported by default, and allow the users to add optional formats, typically by installing additional dependencies. | ||
|
|
||
| In the example below we illustrate how to use ndevio to open a zarr file. Again, we need to install ndevio with either the [napari plugin manager](https://napari.org/napari-plugin-manager/#installing-a-plugin-via-direct-entry) or your preferred Python package manager. | ||
|
|
||
| This basic installation allows to open ome-tiff, ome-zarr, imageio etc. via the plugin. If you need to open another format such as CZI, ND2 etc., you will have to install additional extensions (for example for ndevio please refer to the [instructions](https://github.com/ndev-kit/ndevio?tab=readme-ov-file#additional-image-format-support)). This can be done for example via the [direct entry option](https://napari.org/napari-plugin-manager/#installing-a-plugin-via-direct-entry) of the plugin manager. | ||
|
|
||
| We are now able to just drag and drop a zarr file in the viewer to open it. We use an example from the [IDR OME-NGFF Samples](https://idr.github.io/ome-ngff-samples/) (13457537.zarr, CC BY 4.0, Payne et al. (2019) https://doi.org/10.1126/science.aay3446): | ||
|
|
||
| ```{code-cell} ipython3 | ||
| :tags: [remove-input] | ||
|
|
||
| viewer = napari.Viewer() | ||
| viewer.open('https://uk1s3.embassy.ebi.ac.uk/idr/zarr/v0.4/idr0101A/13457537.zarr', plugin='ndevio') | ||
| viewer.window.resize(width, height) | ||
| nbscreenshot(viewer, alt_text="napari viewer showing a multi-channel zarr image opened via ndevio of a in situ genome sequencing in a fibroblast.") | ||
| ``` | ||
|
|
||
| ## Using the napari console to open an image | ||
|
|
||
| There are a few cases, where it is necessary to resort to some coding in the console (or notebook) to open an image. You can find the console in the bottom panel of napari: | ||
|
|
||
|  | ||
|
|
||
| First, there might be no plugin reader for your format, but only a library to read the data as arrays. In such a case, the images need to be first read as arrays and then added to the viewer. Second, there might be a reader plugin for your format, but the metadata could be missing or badly interpreted, leading to an incorrect loading of the data. In such cases, the data may also need to be read programmatically and added to the viewer after reshaping/pre-processing. In the following example, opening a multi-dimensional tiff file leads to loading the channels as a dimension (first dimension of size 3), instead of being assigned to separate layers: | ||
|
|
||
| ```{code-cell} ipython3 | ||
| :tags: [remove-cell] | ||
|
|
||
| file_path_tiff2 = pooch.retrieve( | ||
| url="https://github.com/guiwitz/microfilm/raw/refs/heads/master/demodata/coli_nucl_ori_ter.tif", | ||
| known_hash="f37020f32fe3f8aa8ef44563646b51dc3517e372564939733181da65e13f0eda", | ||
| fname="coli_nucl_ori_ter.tif", | ||
| path=download_folder | ||
| ) | ||
| ``` | ||
|
|
||
| ```{code-cell} ipython3 | ||
| :tags: [remove-input] | ||
|
|
||
| viewer = napari.Viewer() | ||
| viewer.open(file_path_tiff2) | ||
| nbscreenshot(viewer, alt_text="napari viewer showing a multi-channel TIFF image of E. coli cells.") | ||
| ``` | ||
|
|
||
| Instead we can now first read the data for example with `imageio`, and add it to the viewer while specifying which axis of the array should be split into individual layers, using the `channel_axis` argument: | ||
|
|
||
| ```{code-cell} ipython3 | ||
| image = iio.imread(file_path_tiff2) | ||
| print(f'image dimensions: {image.shape}') | ||
| ``` | ||
|
|
||
| ```{code-cell} ipython3 | ||
| viewer = napari.Viewer() | ||
| viewer.add_image(image, channel_axis=0); | ||
| ``` | ||
|
|
||
| ```{code-cell} ipython3 | ||
| :tags: [remove-input] | ||
|
|
||
| nbscreenshot(viewer, alt_text="napari viewer showing a multi-channel TIFF image of E. coli cells with a layer per channel.") | ||
| ``` | ||
|
|
||
| Note that different reader plugins might interpret your data in different ways. With the same data as above where the builtin `imageio` reader did not split the channels into layers, the `ndevio` plugin identified the channels from the metadata and assigned them separate layers: | ||
|
|
||
| ```{code-cell} ipython3 | ||
| :tags: [remove-input] | ||
|
|
||
| viewer = napari.Viewer() | ||
| viewer.open(file_path_tiff2, plugin='ndevio') | ||
| nbscreenshot(viewer, alt_text="napari viewer showing a multi-channel TIFF image of E. coli cells opened via ndevio.") | ||
|
guiwitz marked this conversation as resolved.
|
||
| ``` | ||
|
|
||
| ## Using plugins to improve image display | ||
|
|
||
| With the release of napari 0.7.0, [napari-metadata](https://napari.org/napari-metadata) is included with the bundle, conda-forge and with `pip install "napari[optional]"` (or `napari[all]`) installations. This plugin provides a widget to view and edit the metadata of layers. This can be useful to check if the metadata was correctly read, and to edit it if necessary. | ||
|
|
||
| 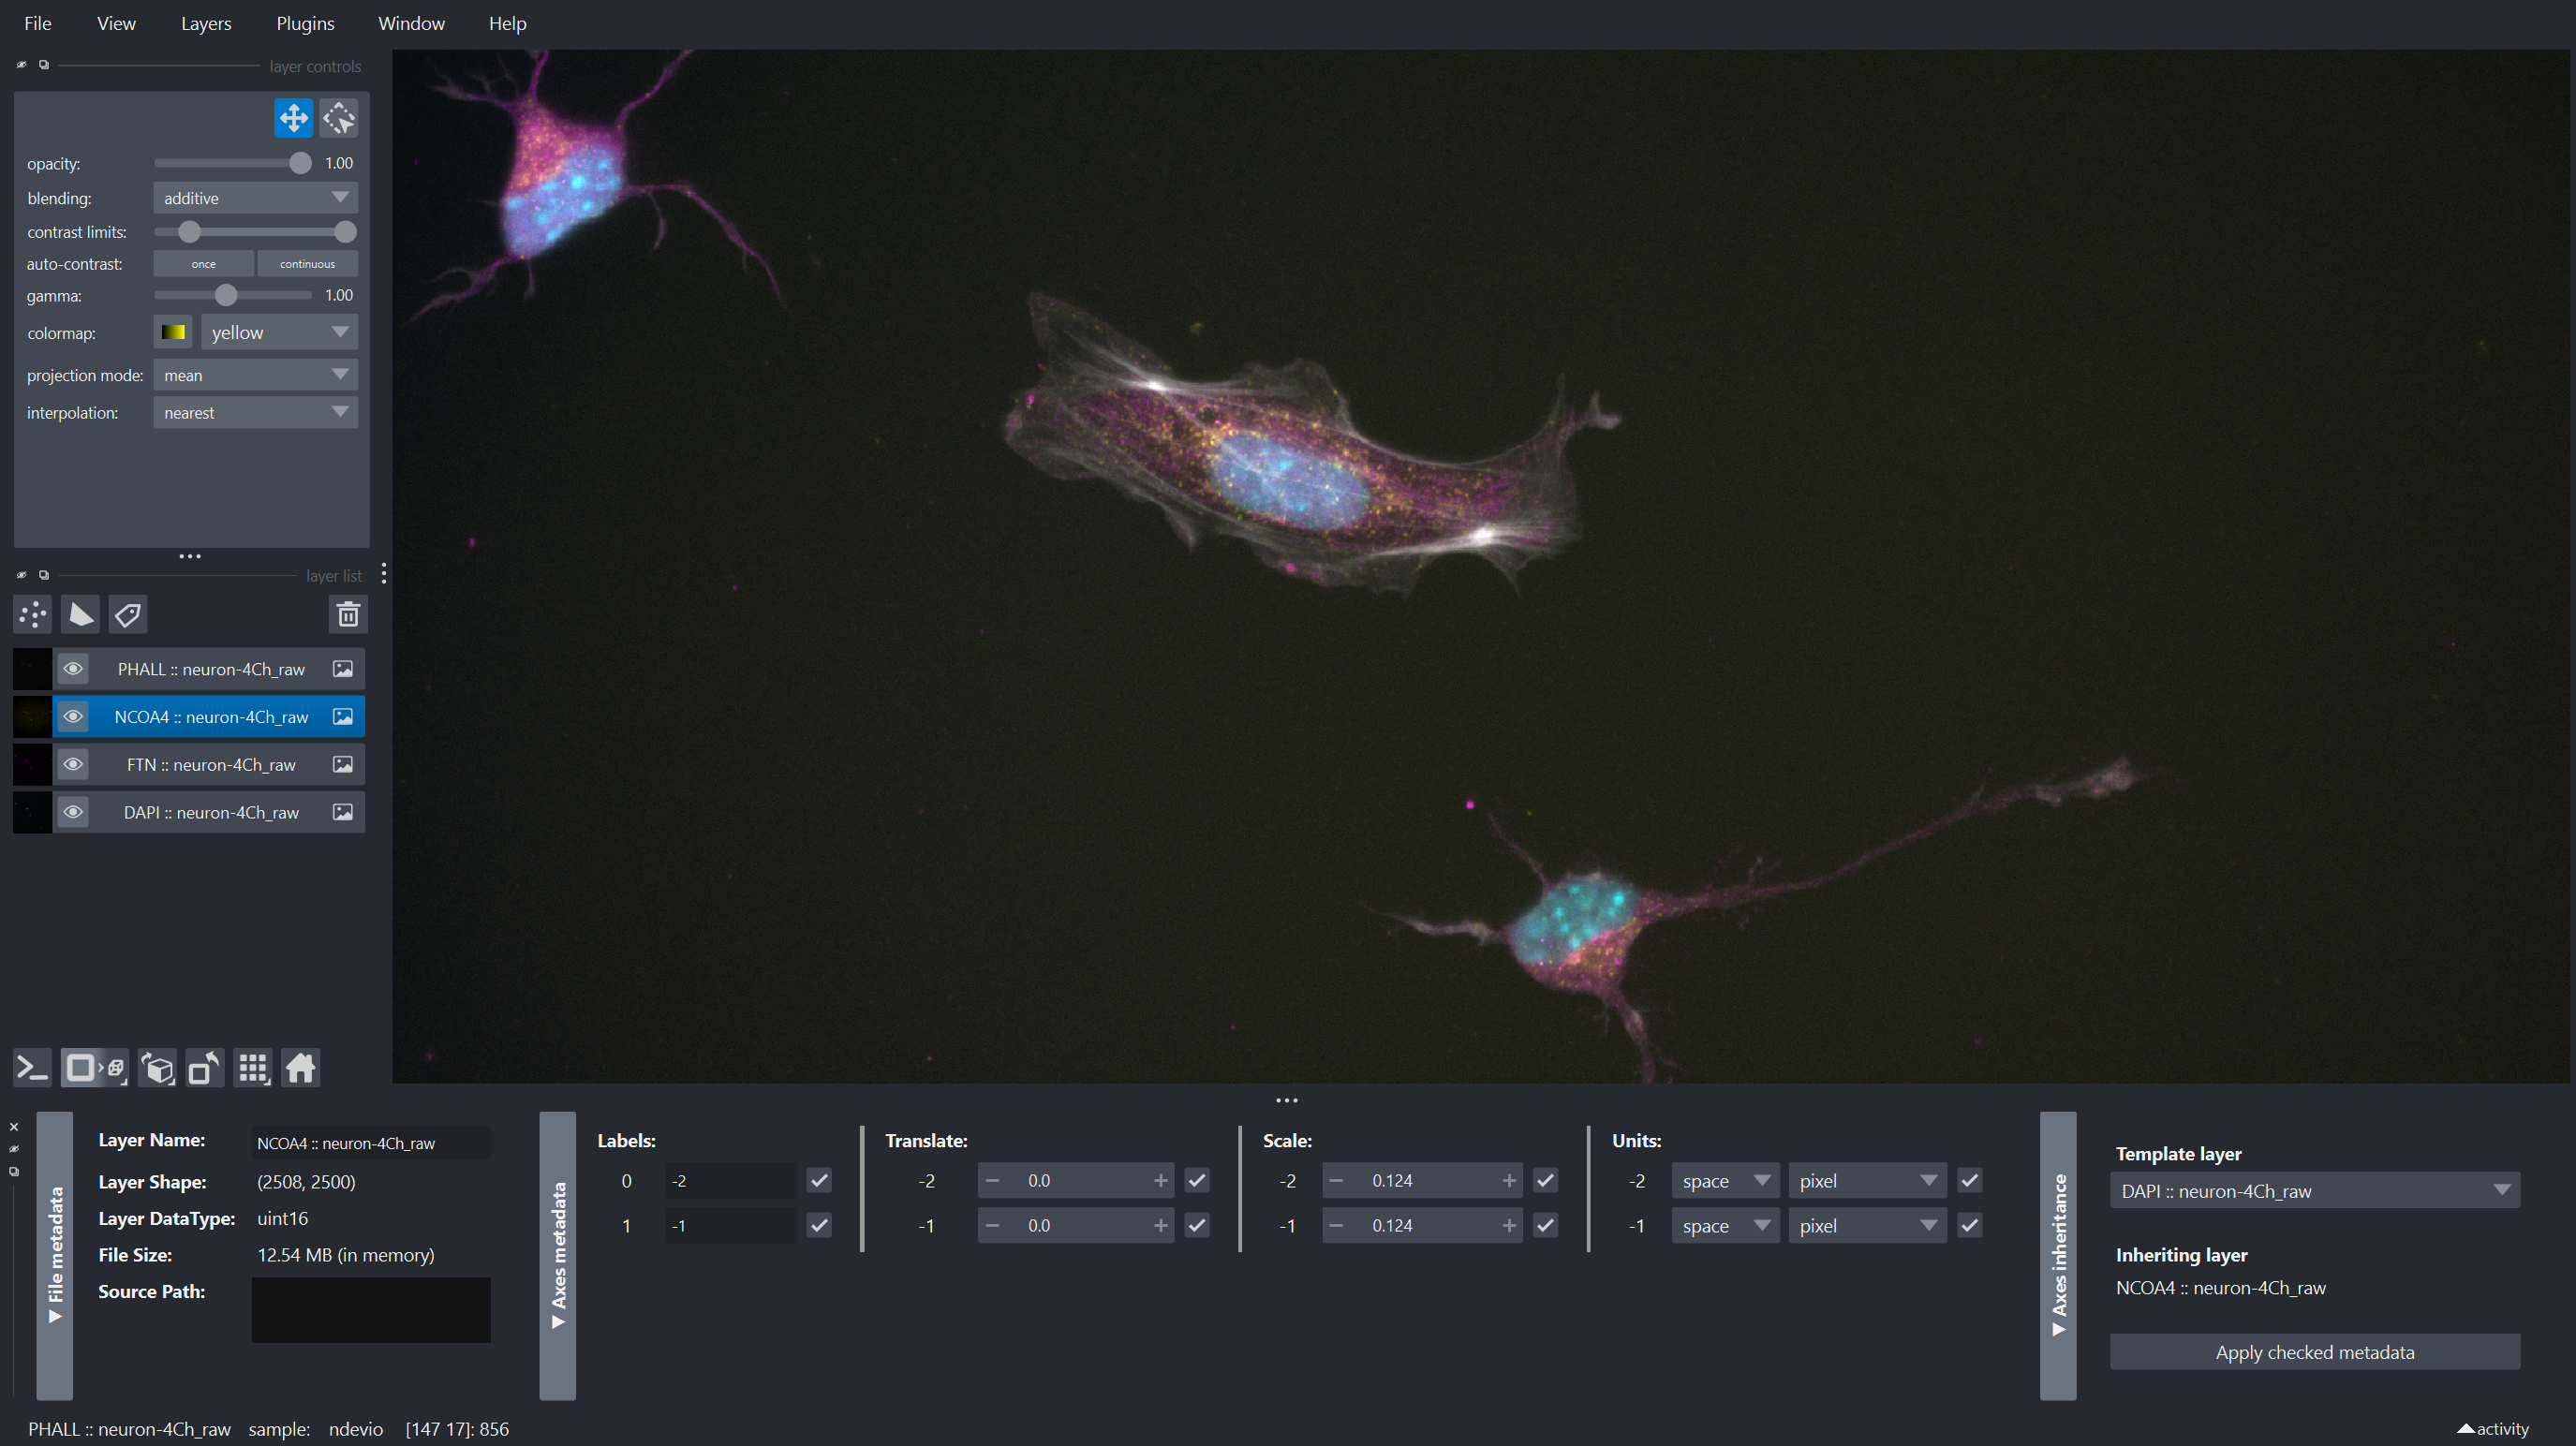 | ||
|
Member
There was a problem hiding this comment. This should be added to
Contributor
Author
There was a problem hiding this comment. This is from the napari-metadata plugin not the docs. Should we duplicate that file?
Contributor
Author
There was a problem hiding this comment. I now modified the download path to |
||
|
|
||
| In the case of badly interpreted dimensions, one can also reshape the data using certain plugins. For example the [napari-skimage](https://napari-hub.org/plugins/napari-skimage.html) plugin provides a tool to reshape layers via the `Plugins -> napari skimage -> Axis operations` menu. Here we use the `swap axes` function to exchange the X and Y axes: | ||
|
Contributor
There was a problem hiding this comment. This will be another spot we can refer to napari-metadata |
||
|
|
||
| ```{code-cell} ipython3 | ||
| :tags: [remove-cell] | ||
|
|
||
| viewer = napari.Viewer() | ||
| viewer.open(file_path_tiff2) | ||
| _, plugin_widget = viewer.window.add_plugin_dock_widget('napari-skimage', 'Axis operations') | ||
| plugin_widget.axis1.value = 2 | ||
| plugin_widget.axis2.value = 3 | ||
| plugin_widget.operation.value = 'swapaxes' | ||
| plugin_widget.btn_apply.native.click() | ||
| viewer.dims.set_current_step(axis=0, value=0) | ||
| viewer.grid.enabled = True | ||
| ``` | ||
|
|
||
| ```{code-cell} ipython3 | ||
| :tags: [remove-input] | ||
|
|
||
| viewer.reset_view() | ||
| nbscreenshot(viewer, alt_text="napari viewer showing twice the same multi-channel TIFF images in grid mode, the second with X and Y axes swapped via napari-skimage.") | ||
| ``` | ||
Add this suggestion to a batch that can be applied as a single commit.
This suggestion is invalid because no changes were made to the code.
Suggestions cannot be applied while the pull request is closed.
Suggestions cannot be applied while viewing a subset of changes.
Only one suggestion per line can be applied in a batch.
Add this suggestion to a batch that can be applied as a single commit.
Applying suggestions on deleted lines is not supported.
You must change the existing code in this line in order to create a valid suggestion.
Outdated suggestions cannot be applied.
This suggestion has been applied or marked resolved.
Suggestions cannot be applied from pending reviews.
Suggestions cannot be applied on multi-line comments.
Suggestions cannot be applied while the pull request is queued to merge.
Suggestion cannot be applied right now. Please check back later.
Uh oh!
There was an error while loading. Please reload this page.